Make this adorable mini anchor chart stand!

Seriously, make it. Even if you don’t need it. Why? It’s cheap and it’s cute, and you’ll probably find really good use for it.

photo 1

Let’s first talk about why and how.

If you run your room on centers and rotations, you know that no matter how many times you explain what goes on at each center, there will be 50% not listening, 30% confused, 10% that think they aren’t confused but they really are, and 10% who know what to do but don’t feel like sharing that knowledge with others.

In the past, I’ve displayed the centers and jobs to get done on the board, via my computer. This year, I’ve been blessed with a room that has a TV. A TV from the year I was born, hooked up to a computer. The chances that kids will be able to use that little piece of technology to successfully complete each center (especially ones on the other side of the room) is slim to none. What  I needed was a stand at each center that could easily display the directions for ALL students to see and refer back to as necessary.

So I searched the world wide web of Pinterest for ideas and found the concept of mini anchor charts made from CPVC pipes. Genius!

So of course, I dragged my fiance to Lowes (not really; I had to drag him out) and we stood in the pipes isle and contemplated. And built things on the ground and pondered, and acted like they were swords for a bit, and then got down to business. This receipt here shows what I decided on:

photo

The first thing you may notice is, “Oh, I use Amex too. Good rewards on that card.” The second thing you may notice is “She must have made 3 anchor chart stands.” The third thing I hope you notice is, “That’s the least expensive thing I’ll ever buy for my classroom. Ever.”

Exactly.  So here are the real names of the materials you’ll need for EACH anchor chart. I made three, so I got 6 attachments and 2 long pipes.

2 : 1/2″ Wing Elbow (not the special female part…those don’t work and they’re expensive)

2 : 1/2″ 90 Degree Elbow

1 : 1/2″ 5 foot long CPVC pipe

Make sure you have something to cut it with, or ask the people at Lowes to do it for you. We opted to do it ourselves because we had this evil blue tool in the picture below that I think made me bleed.

photo 3


For each stand, I had the boy measure and cut two long pieces at 12 inches each, and one short piece at 10 inches. You can play around with this. We actually made them too wide the first time, so we recut. Easy peasy.


So cut out everything to size. Use the wing elbows as the stability at the bottom, and the 90 degree elbows to connect the stand.

photo 4

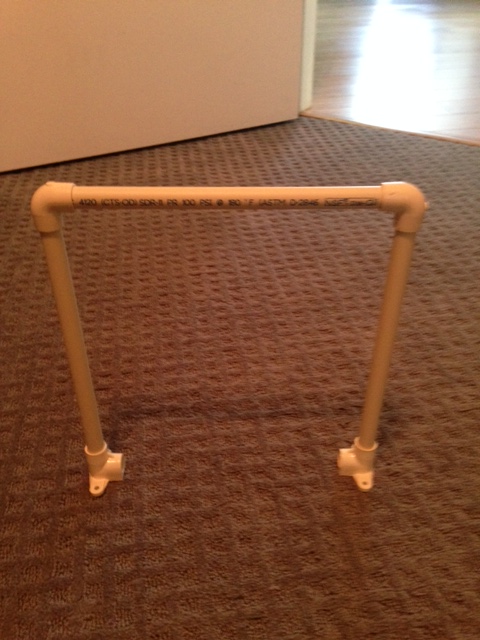
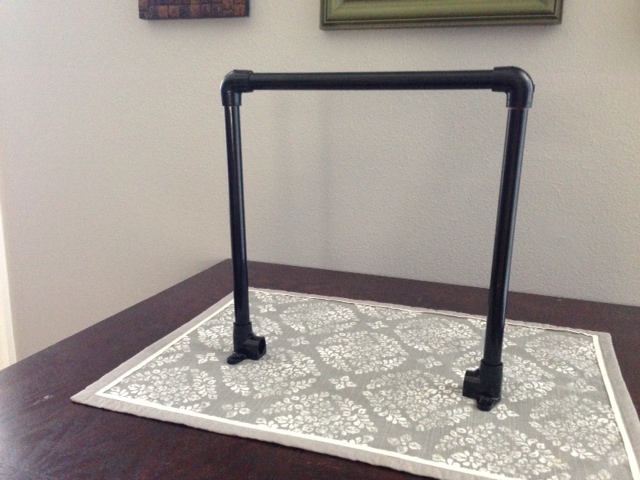
When you’re done, they look like this. (I have no idea why these are uploading so blurry. Imagine they aren’t blurry. Enjoy.) At this point, you can just say you like ugly things or you can cover them up in tape like I’ve seen on Pinterest OR go with one solid color and spray paint. I opt for spray paint because I spray paint everything.


photo 1


Display stand on a placemat from Target, set on a table, and enjoy.

Wait. Actually, use them at school. Since it’s summer and naturally I’ve literally finished 30 weeks of ELA centers, which have been printed and laminated, I tried it out.

photo 2

Success.

The way I am using these, has the chart stand looking like this without directions.

photo 3

All of the directions are cut out to size, and simply slipped under the clothespin. Of course, if you wanted to be fancy and use velcro or that blue sticky tack, you could do that. I’m good with not being too too fancy.

That said, you could just hole punch every center and throw them all on the ring, and toss them over the side when they change out. I will likely be doing that for my “Teacher Time” center.

I will be compiling my centers in the next few weeks. This is actually quite the process. But when they are done, they will be posted as a freebie for a few first commenters and then available for purchase at my TPT store.

Sooo…will you be making these little guys? Would love to hear how you plan to use yours!


Summer Vacation! (Except teachers never truly rest…)

Good morning and happy summer, friends! (Sorry in advance if you’re not on summer vacation yet, and you want to stab the computer for seeing this.)

I’ve recently gained quite a few wonderful followers, many of whom have asked for the availability of certain products that you’ve seen posted, but can’t find in my TPT store.

There also were some link issues with freebies I had posted. So my hope is to get all of these products uploaded for you in this post, so you can download for free and enjoy in your classroom next year. 🙂 Let’s get started!


First things first, the Library Pockets!

so bright and pocket-y

The entire download is available here!


The hand signals, which I’ve used for years and could not live without:

photo 1


You can download those here now! On a side note, you can download my homework labels at my store.


The pencil jar labels that again, I could not do without.

photo 5

Please download these babies as you wish!


The Specials labels, which are formatted for the ones we have. My apologies if I haven’t included a Specials program that you have. Feel free to request, though!

photo 1


These were changed after I posted (to black with brights on top). Slightly different, same idea!


Learning goals.

Picture 3


Download here! (You can download my scale, which matches it all, here.)


Now, something new!


This is how my library looked last year, and I adored it. (Reading Zone can be found here, and AR point board can be found here.)

photo 5

photo 3


However, things are changing. I am so excited to find myself moving to third grade next year! After four years in fifth grade, I am ready for a change.


That means I packed up my room, lugged half of it home and left the rest in my new classroom, which I cannot wait to decorate and reveal. I also did some reflecting. For my 5th graders, I organized the books by AR level. I wanted to change it up for my new littles. As we transition to Common Core, our little ones will need to be a bit more well-versed in genre than before. (Or maybe I was just slacking.) So for this upcoming year, I did this:


10302015_10154208283875268_6298157230732800711_n


(Love the engagement pictures easily visible through the coffee table top. Whoops!)


To make a long story short, I took the bins home, spray painted them (said a few bad words as I watched the spray paint slip down the plastic and die), then re-spray painted them with better paint meant for plastic, and created labels. The labels were laminated, attached with super glue and mod podge to secure them in place, because I don’t have such great luck with super glue.


That terrifying moment when you think the mod podge will never dry and you just ruined your life.

Then, I created labels that align with Avery 8160 Address Labels (1″ x 2 5/8″). These labels are simplified versions of the black genre labels, as they include the same picture. This makes it super easy to see where the books belong,

photo 2 photo 3

I’m super excited about doing things this way! I really think it’ll help the kids choose books that fit their interests AND help them branch out and try out new genres. On a completely other level, when I want to model a specific genre, such as poetry, it’ll be very easy for me to find a book to guide the students through.

You can download the genre labels, the  banners above the labels, and the avery labels by clicking on the links in this sentence! The avery labels contain a bunch of repeats, but again, this is what I found I needed to label all the books, so feel free to sift through and use as needed.

I hope that this post helps you find the things you want and need! Please comment below if you don’t see something you were hoping for, and I’ll do my best to get it up here soon. 🙂

Happy Summer, everyone!